#simplycreate a Portrait
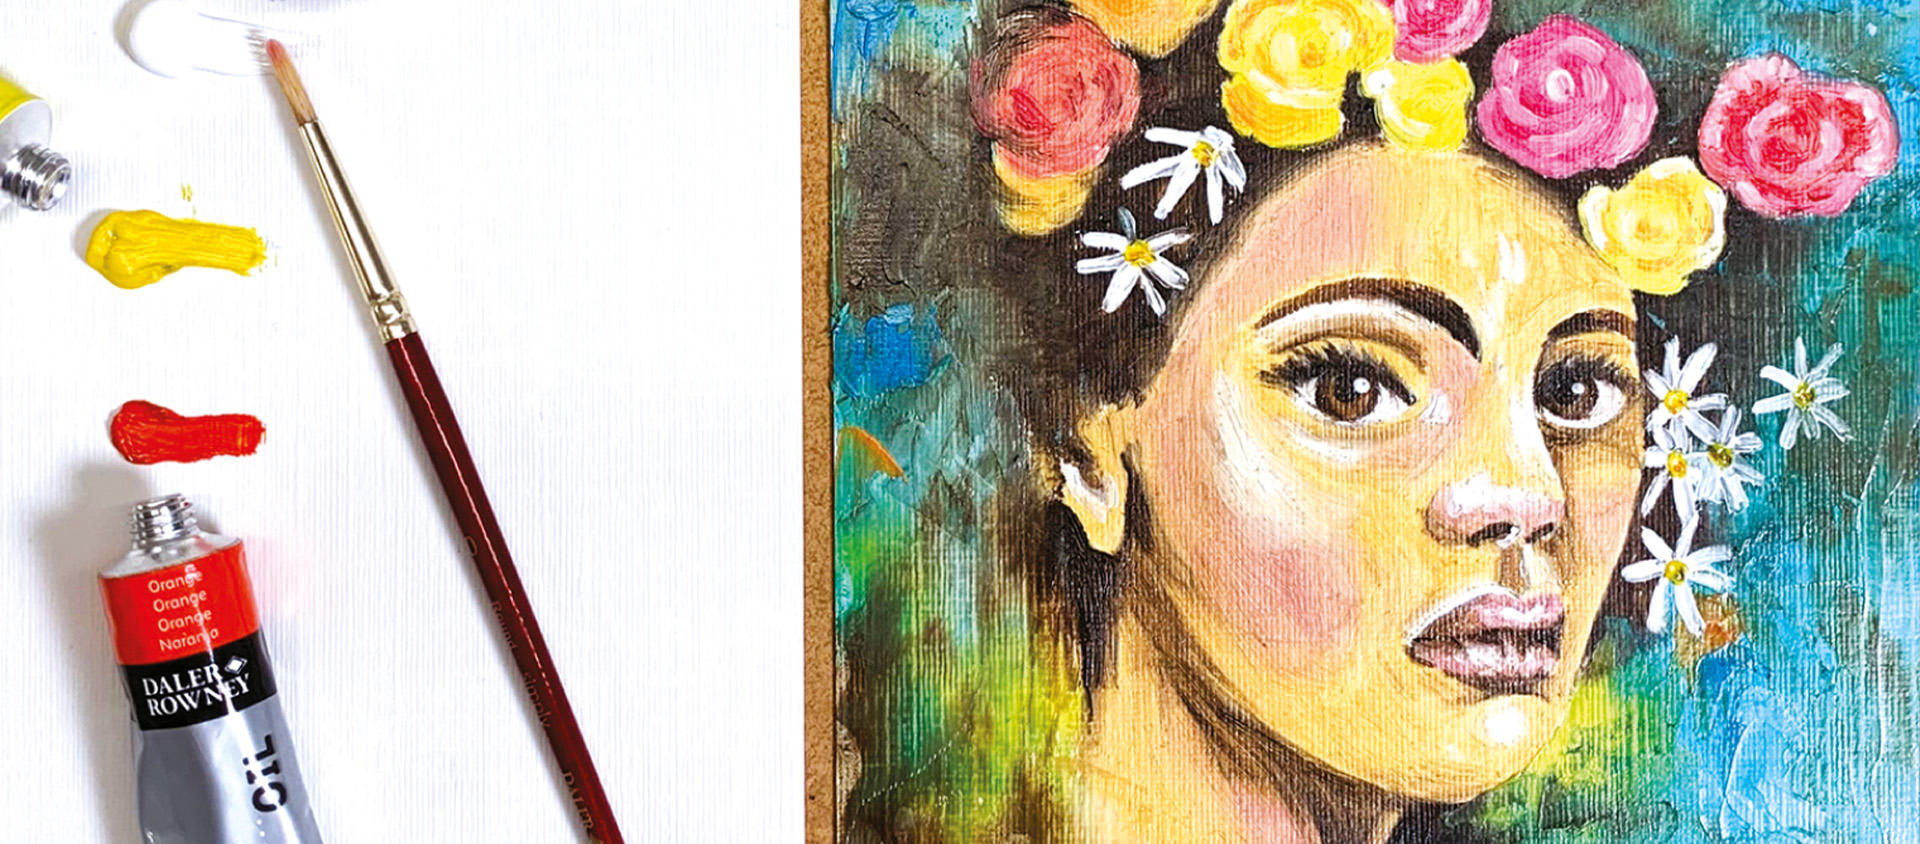
How To Paint a Portrait with Oil
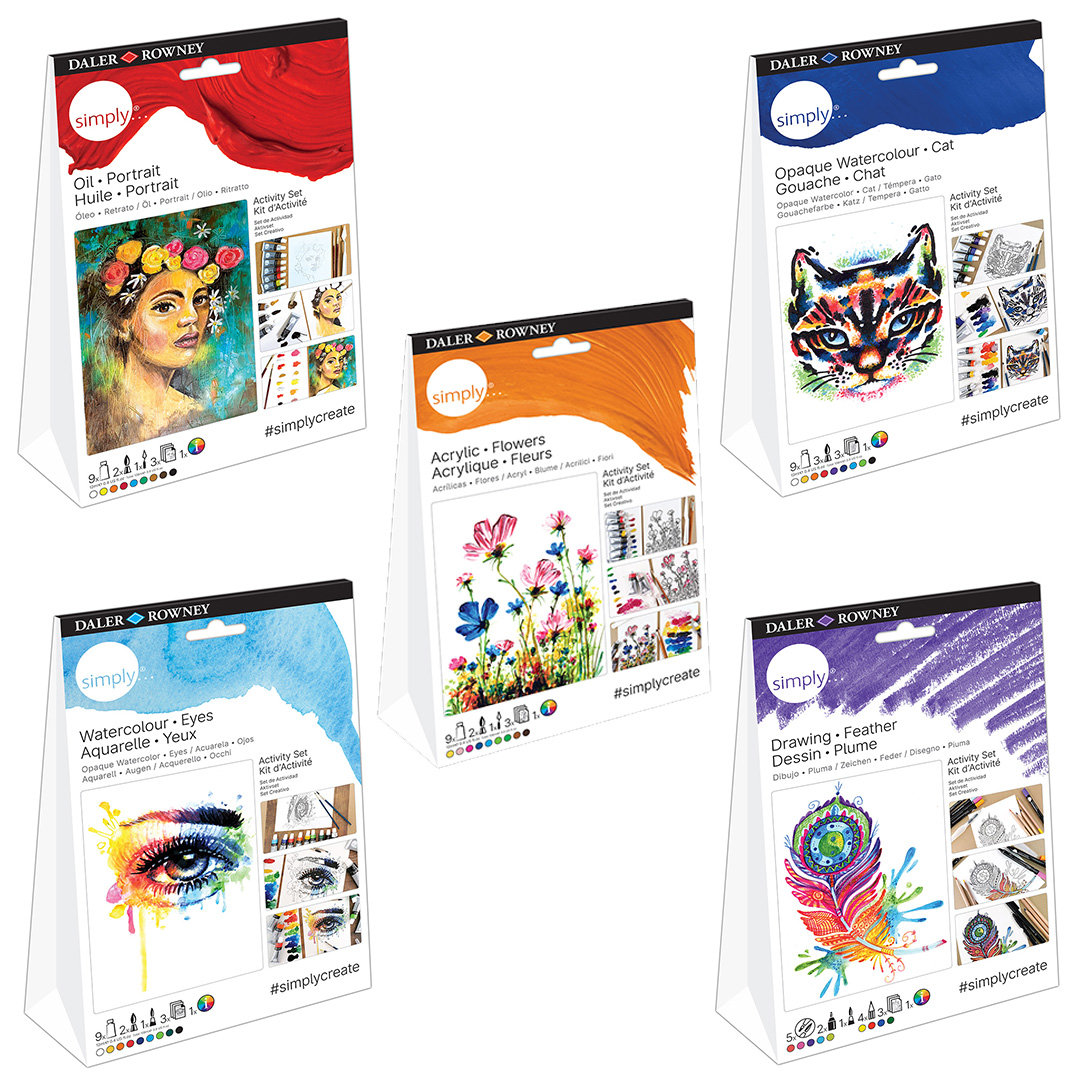
Learn how to use oil paints with the Simply Portrait Painting Activity Set. This set includes the template, paint brushes and oil paint that you will need to create a portrait! This step-by-step guide has been created by Daler-Rowney artist Jenny Muncaster and is easy for artists to follow and to explore with oil paint!
How To Paint a Portrait with Oil
Learn how to use oil paints with the Simply Portrait Painting Activity Set. This set includes the template, paint brushes and oil paint that you will need to create a portrait! This step-by-step guide has been created by Daler-Rowney artist Jenny Muncaster and is easy for artists to follow and to explore with oil paint!
The materials in your kit
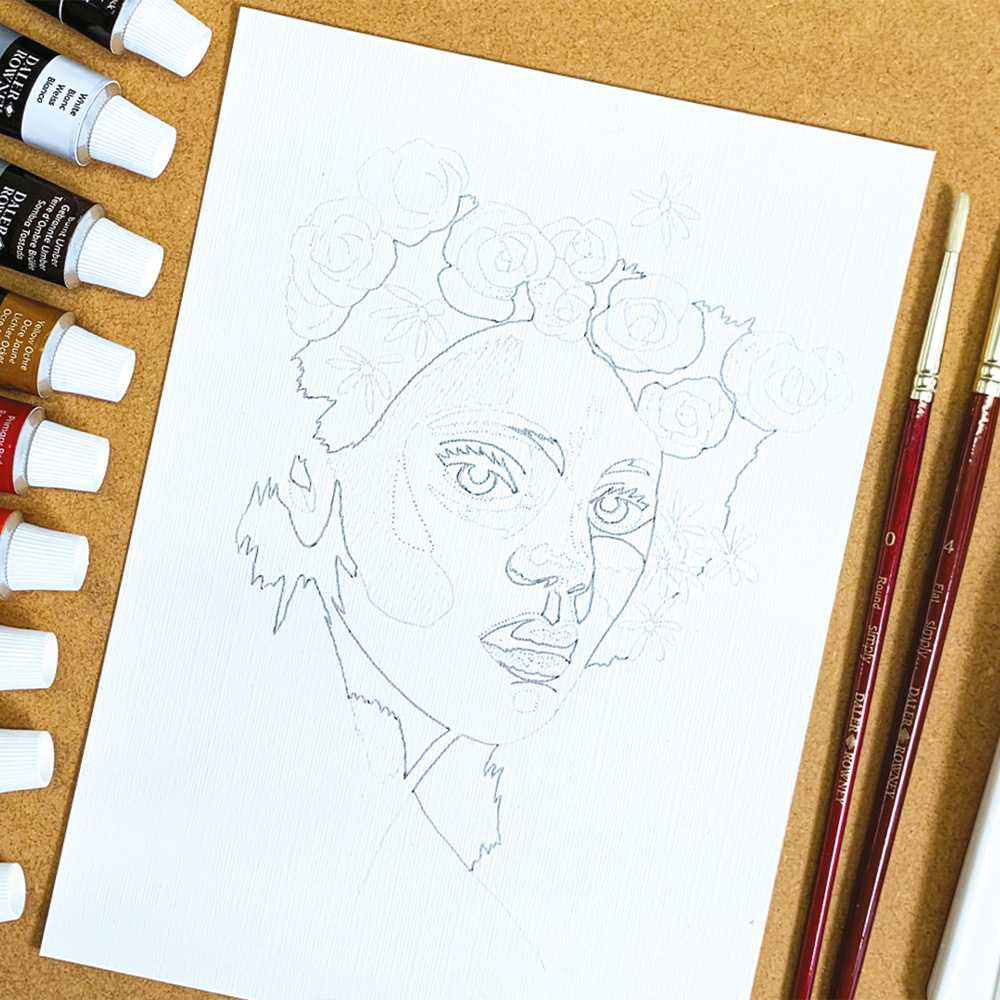
Your step by step guide
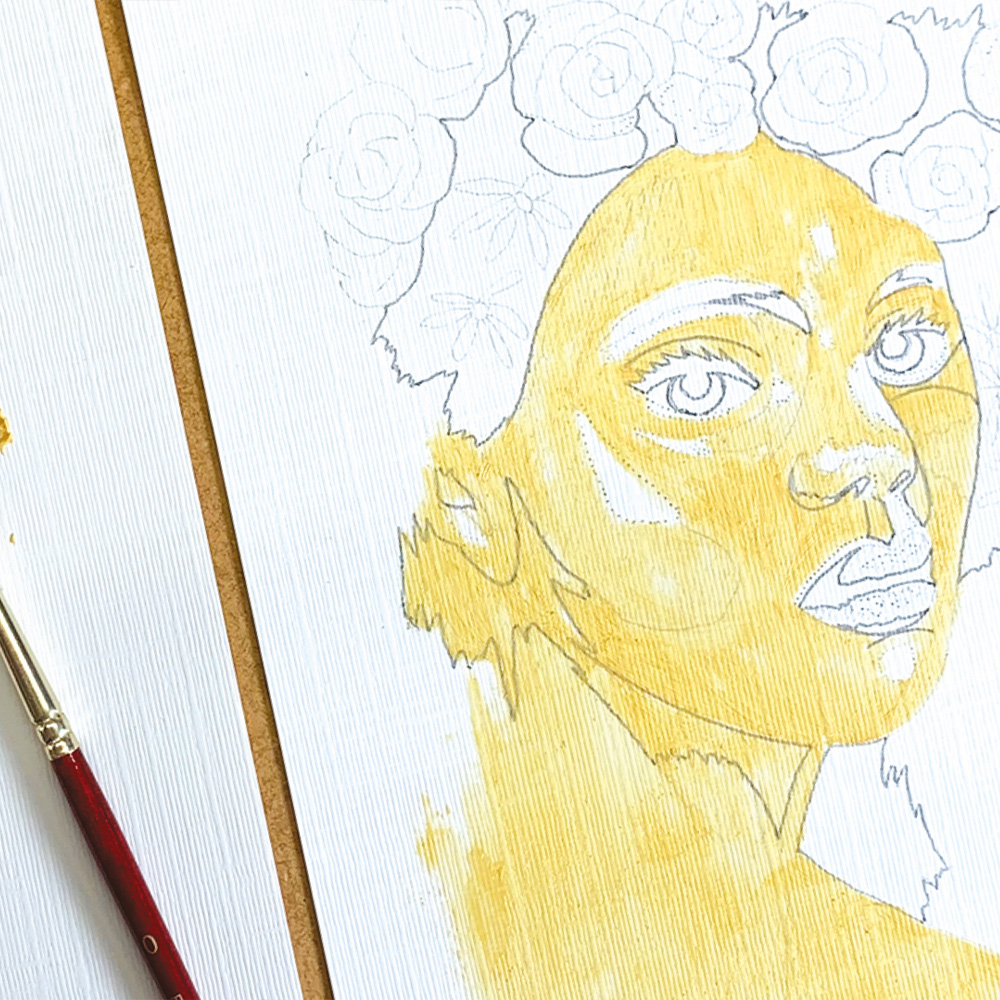
Sit comfortably at a table with all your equipment provided within the kit. Mix up a mid-skin tone using yellow ochre, white and a small amount of orange. Using both brushes apply a thin coat to the face and shoulders avoiding the eyes and mouth. Tip – you always use more white than you think, so add little bits of colour to your white rather than adding white into your colour.
Remove excess paint from the brush with paper towel. Next clean your brush with the thinners and dry well on paper towel. Do this each time you change colour.
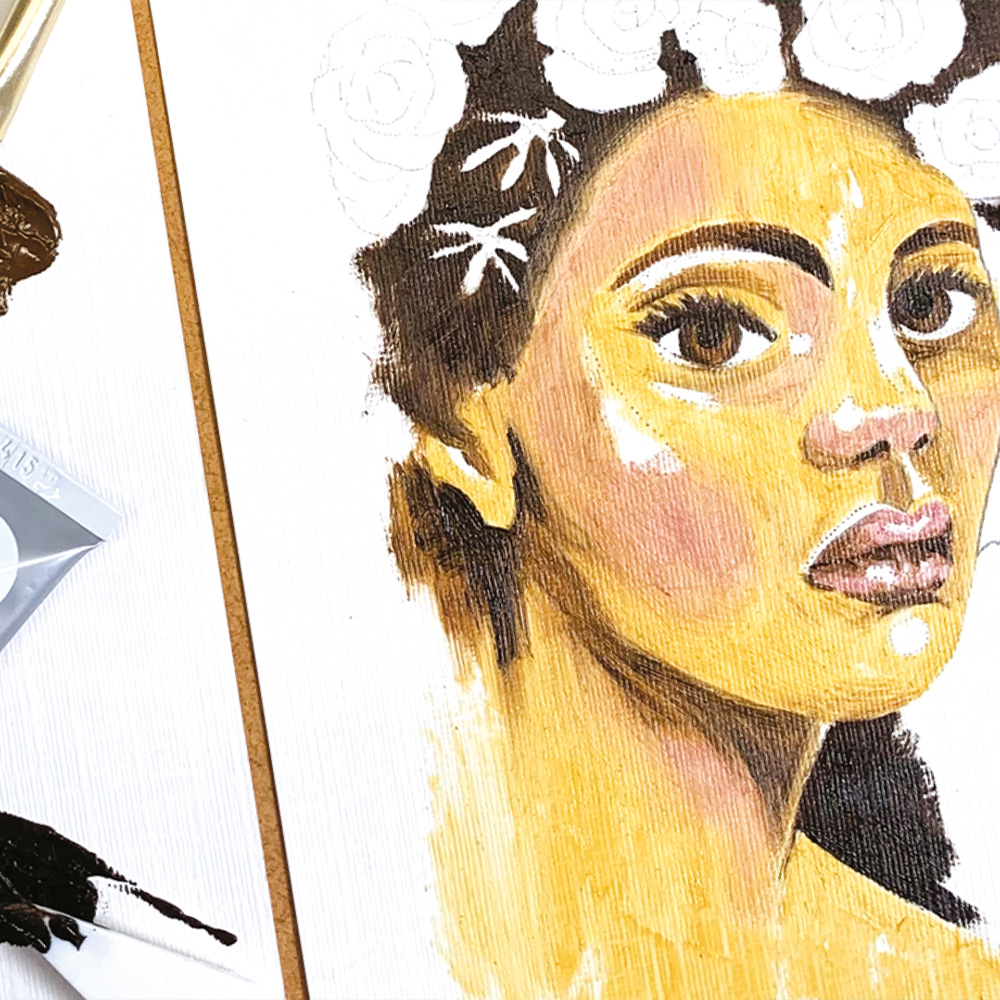
Mix a dusky pink using primary red, burnt umber and a little white. Apply to all shaded areas. Blend your edges a bit where the colours meet.
Tip: Use the number 4 brush along the forehead and cheeks to create some broader brush strokes.

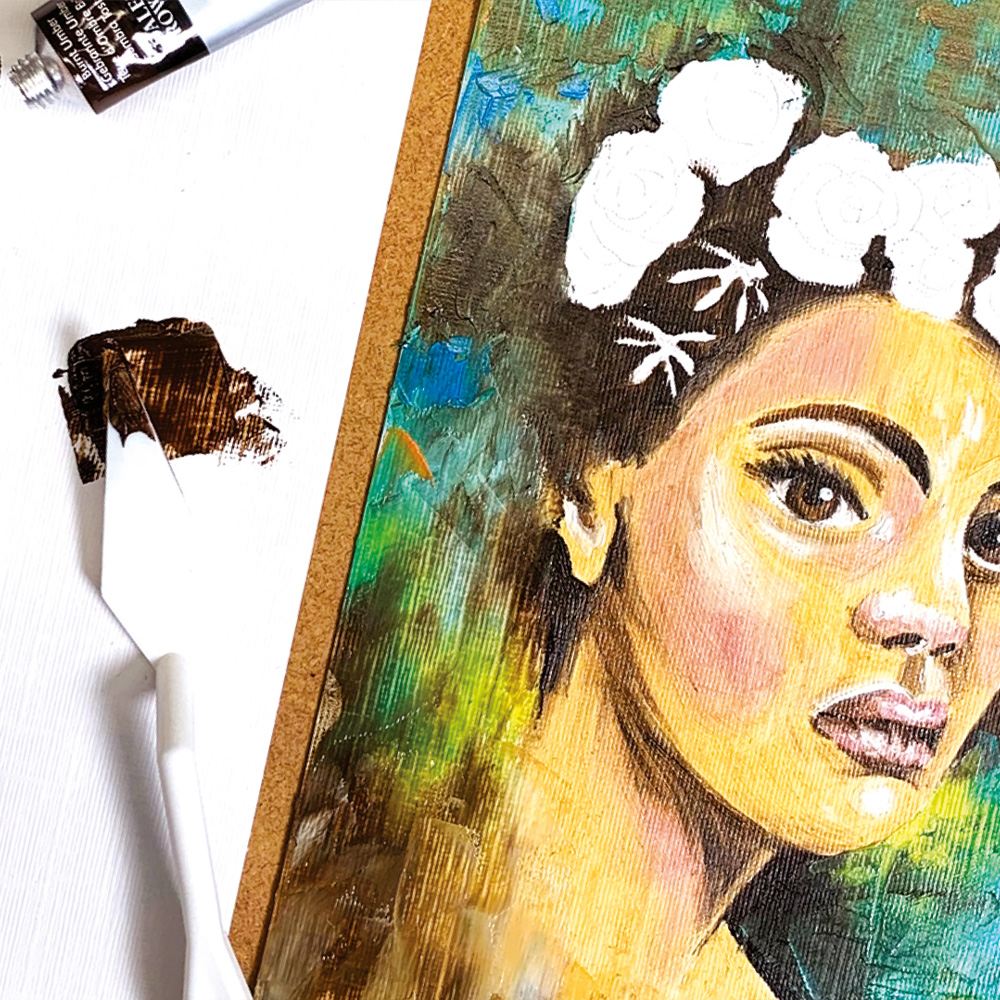
Mix burnt umber, yellow ochre and a little white to create a mid-brown, and use the number 0 brush paint for the eyes and brows. Use this colour to create some darker areas within the thicker lined areas under the chin and mouth, around the eyelids, ear and neck. Use the number 4 brush under the chin and on the neck.
Next mix burnt umber and a little black. Use this again within some of the thicker lined areas on brows and between the flowers to create depth and contour. With the number 0 brush, paint in eyelashes, nostrils and centre of the eyes. Also, add this colour under the bottom lip and the base of the top lip.
Use white to fill in the eyes and to add highlights within the dotted areas and use the number 0 brush to create a white dot in each eye.
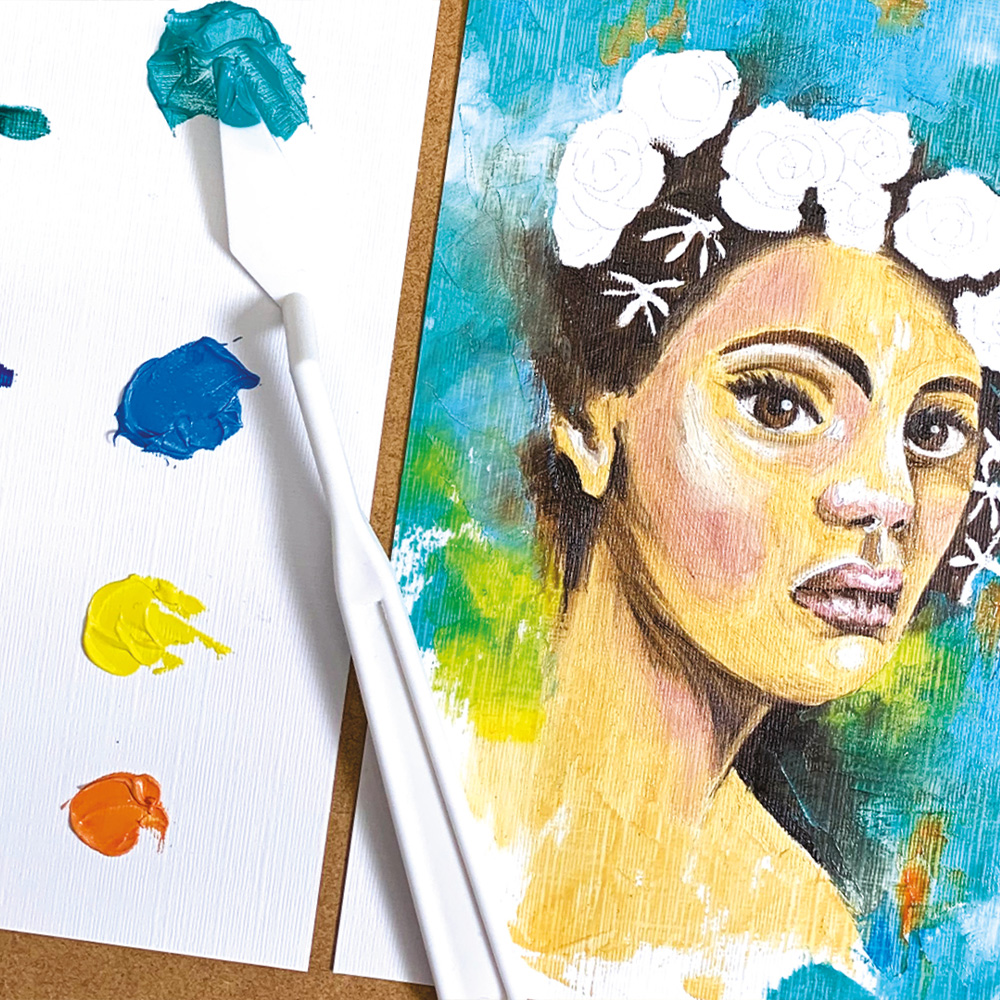
Use the palette knife to mix up viridian (green) and a little white. Still using the knife spread the paint onto the background taking care around the face. Repeat this process with the coeruleum (blue) and a little white to create a textural and interesting background.
Add dots of orange and a couple of small areas of lemon mixed with white as well. You can use the number 4 brush to soften some areas.
Still using the palette knife, mix burnt umber with a little orange and white. Spread this onto the base of the shoulders and up the edges of the paper. Blend into the darker areas on the head between the flowers.
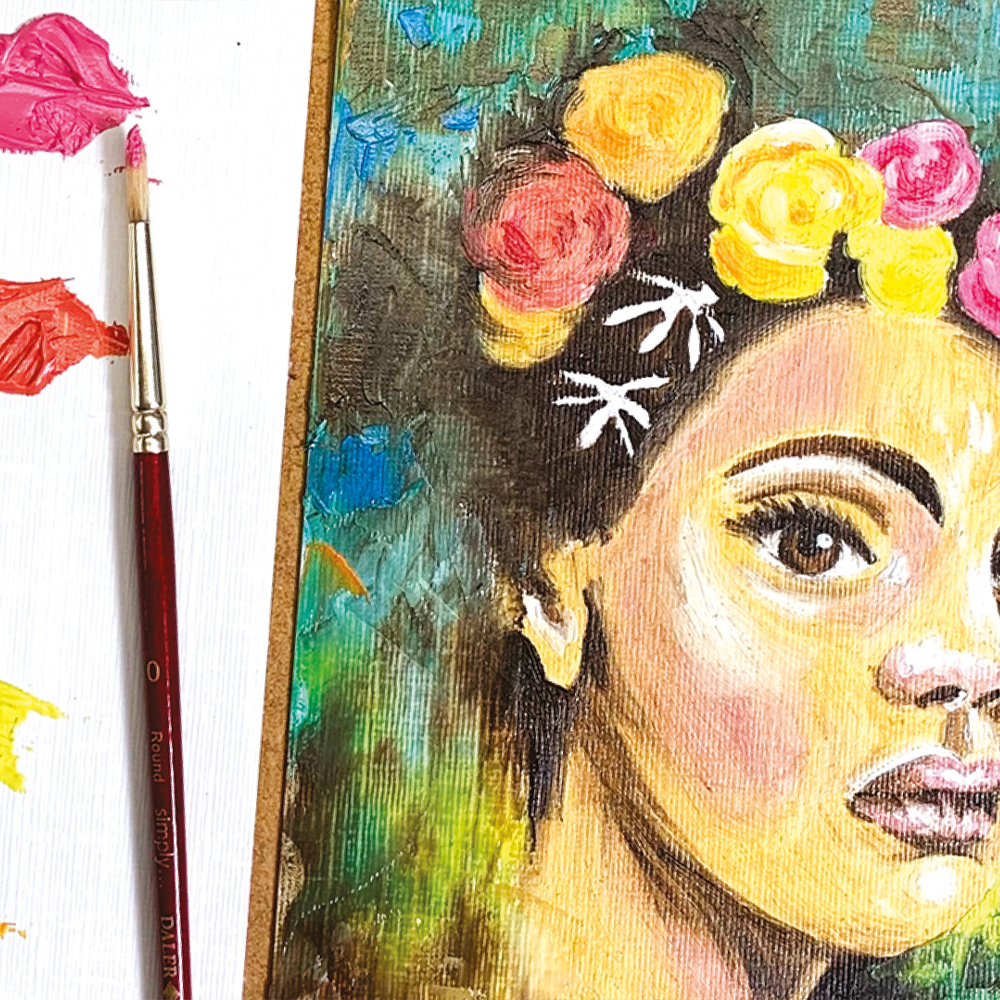
Use primary red, white and orange to make a selection of pinks. Paint in some of the roses. Using lemon yellow and white fill in the remaining ones. Use deeper shades of these colours and the number 0 brush to create shadows and contours. Use white inside the dotted areas to create highlights.
Use primary red, white and orange to make a selection of pinks. Paint in some of the roses. Using lemon yellow and white fill in the remaining ones. Use deeper shades of these colours and the number 0 brush to create shadows and contours. Use white inside the dotted areas to create highlights.
With the number 0 brush paint on the small white flowers. Dot in lemon yellow and orange for the centres.
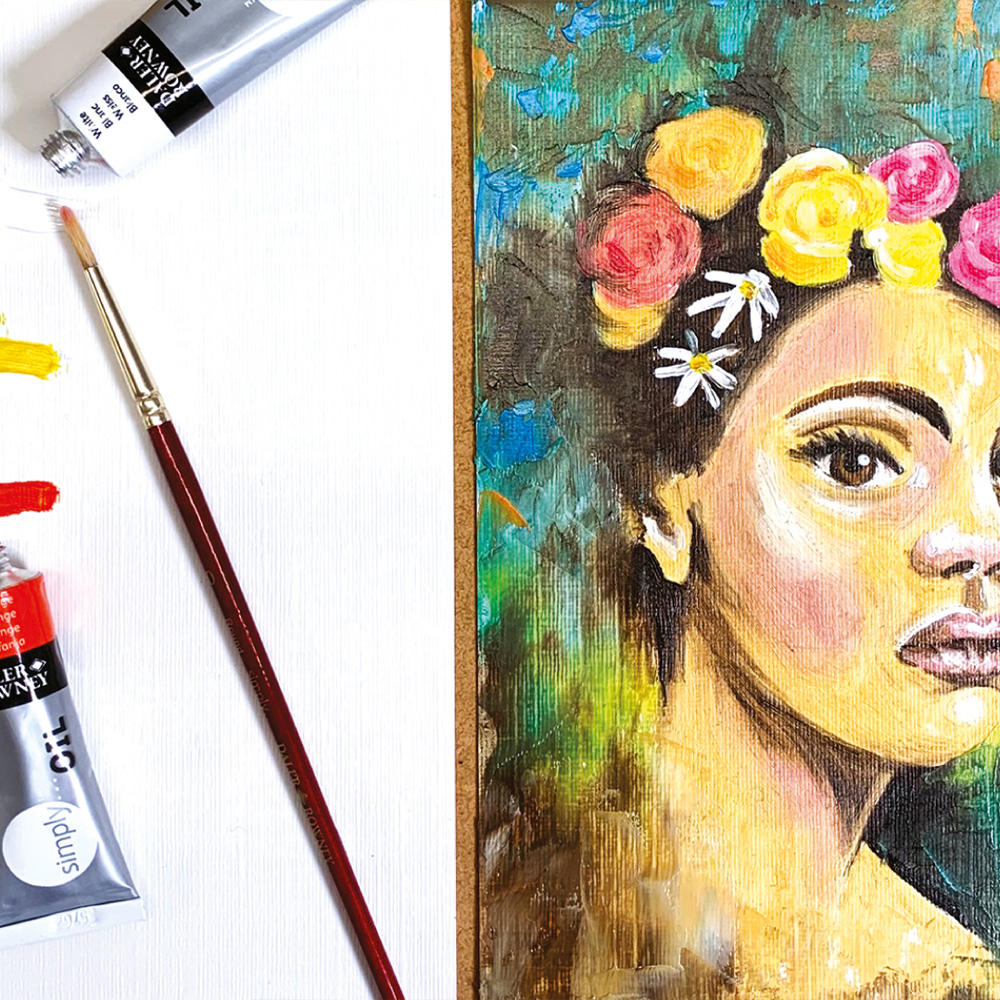
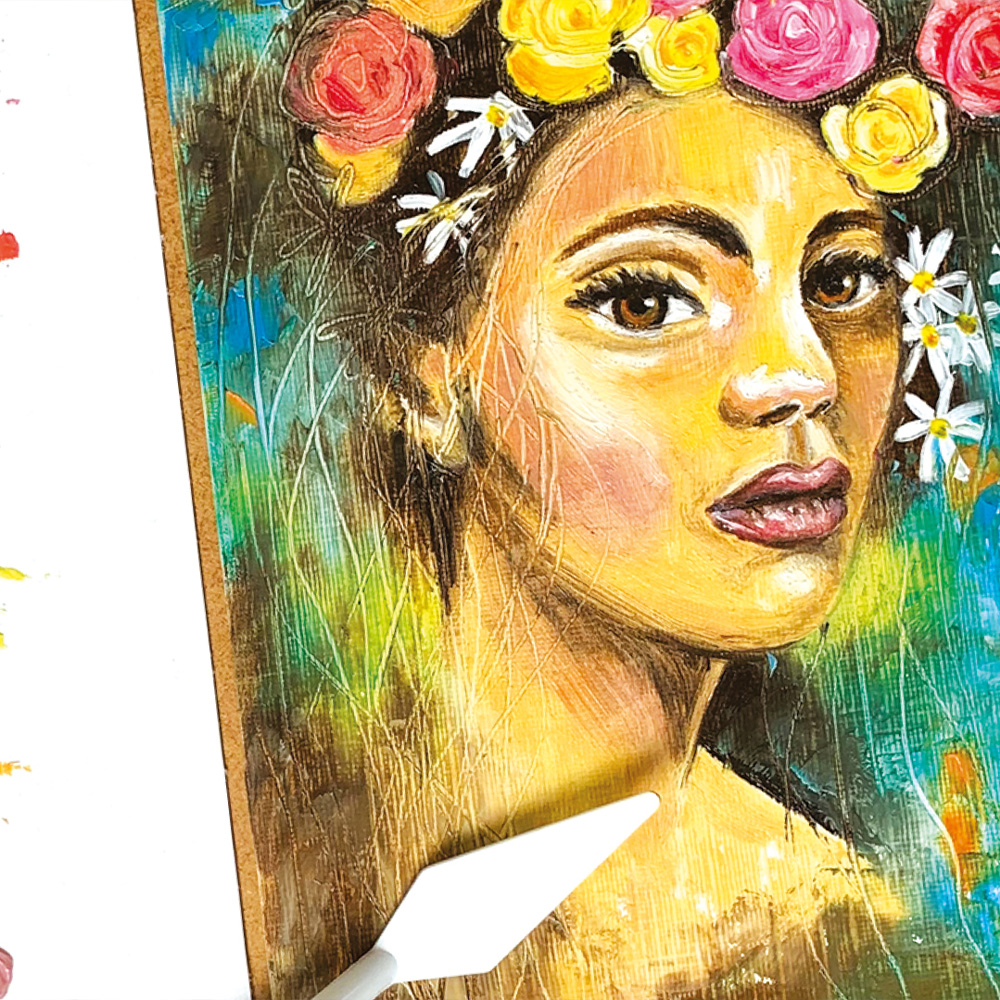
Use the remaining colours on your palette to perfect the face, and add finishing touches, applying extra colour onto the face if you wish. Finally, use the tip of your palette knife to scratch through the wet paint to create hair, and line detail around the roses. You can also scratch in extra flowers using this technique.
Leave to dry – approx. 3 days while you do another one!
Your step by step guide
Sit comfortably at a table with all your equipment provided within the kit. Mix up a mid-skin tone using yellow ochre, white and a small amount of orange. Using both brushes apply a thin coat to the face and shoulders avoiding the eyes and mouth. Tip – you always use more white than you think, so add little bits of colour to your white rather than adding white into your colour.
Remove excess paint from the brush with paper towel. Next clean your brush with the thinners and dry well on paper towel. Do this each time you change colour.
Mix a dusky pink using primary red, burnt umber and a little white. Apply to all shaded areas. Blend your edges a bit where the colours meet.
Tip: Use the number 4 brush along the forehead and cheeks to create some broader brush strokes.
Mix burnt umber, yellow ochre and a little white to create a mid-brown, and use the number 0 brush paint for the eyes and brows. Use this colour to create some darker areas within the thicker lined areas under the chin and mouth, around the eyelids, ear and neck. Use the number 4 brush under the chin and on the neck.
Next mix burnt umber and a little black. Use this again within some of the thicker lined areas on brows and between the flowers to create depth and contour. With the number 0 brush, paint in eyelashes, nostrils and centre of the eyes. Also, add this colour under the bottom lip and the base of the top lip.
Use white to fill in the eyes and to add highlights within the dotted areas and use the number 0 brush to create a white dot in each eye.
Use the palette knife to mix up viridian (green) and a little white. Still using the knife spread the paint onto the background taking care around the face. Repeat this process with the coeruleum (blue) and a little white to create a textural and interesting background.
Add dots of orange and a couple of small areas of lemon mixed with white as well. You can use the number 4 brush to soften some areas.
Still using the palette knife, mix burnt umber with a little orange and white. Spread this onto the base of the shoulders and up the edges of the paper. Blend into the darker areas on the head between the flowers.
Use primary red, white and orange to make a selection of pinks. Paint in some of the roses. Using lemon yellow and white fill in the remaining ones. Use deeper shades of these colours and the number 0 brush to create shadows and contours. Use white inside the dotted areas to create highlights.
Use primary red, white and orange to make a selection of pinks. Paint in some of the roses. Using lemon yellow and white fill in the remaining ones. Use deeper shades of these colours and the number 0 brush to create shadows and contours. Use white inside the dotted areas to create highlights.
With the number 0 brush paint on the small white flowers. Dot in lemon yellow and orange for the centres.
Use the remaining colours on your palette to perfect the face, and add finishing touches, applying extra colour onto the face if you wish. Finally, use the tip of your palette knife to scratch through the wet paint to create hair, and line detail around the roses. You can also scratch in extra flowers using this technique.
Leave to dry – approx. 3 days while you do another one!
What you'll need
Simply Activity Sets
Daler-Rowney Simply Activity Sets provide a perfect activity for beginner artists and hobbyists to start working with different paint types.
MOREAbout the artist